


Valve adjustments
Adjustment – Engine Stopped
With the valve cover removed, adjust the valves when the lifter is on the base circle of the cam, as follows:
1. Crank the engine with the starter, or turn it in the normal direction of rotation until the mark on the harmonic balancer aligns with the “TDC (Top Dead Center)” mark on the timing pointer and the engine is at No. 1 firing position. This can be determined by placing your fingers on No. 1 valve as the balancer mark approaches the “TDC” mark on the timing pointer. If the valves move as the timing mark is approached, the engine is at No. 6 firing position and must be rotated one more full turn to reach No. 1 firing position.
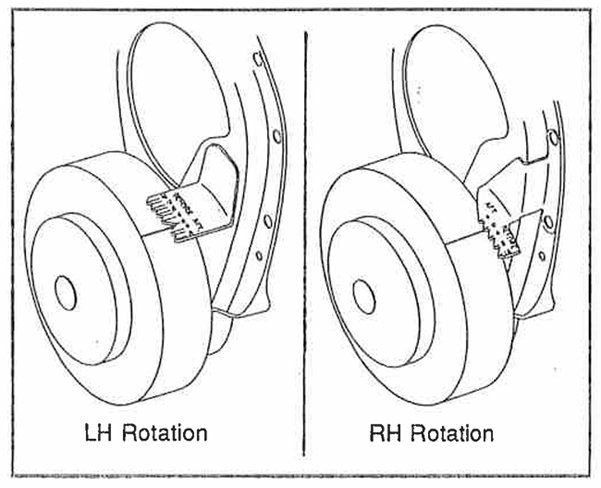
Fig. 8-118 Engine at No. 1 firing position – Left-hand rotation / Right-hand rotation
2. With the engine at No. 1 firing position as determined above, see Figure 8-119 for which valves to adjust.
3. Back off the adjusting nut until lash is felt at the pushrod, then tighten the adjusting nut until all lash is removed. This can be determined by moving the pushrod up and down while turning the adjusting nut until all free play is eliminated.
4. Hydraulic lifters can now be set by tightening the adjusting nut an additional 3/4 turn. No further adjustment is required.
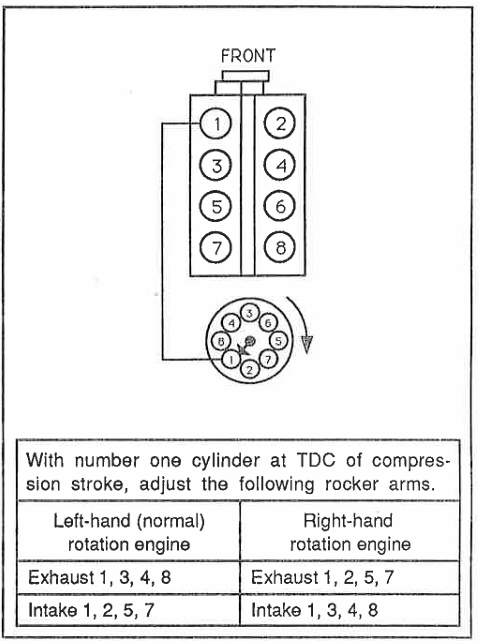
Fig. 8-119 Rocker arm adjustment with No. 1 piston at TDC on the compression stroke
With cylinder No. 1 at TDC on the compression stroke, adjust the following rocker arms:
Left-hand engine rotation (standard) Right-hand engine rotation
Exhaust: 1, 3, 4, 8 Exhaust: 1, 2, 5, 7
Intake: 1, 2, 5, 7 Intake: 1, 3, 4, 8
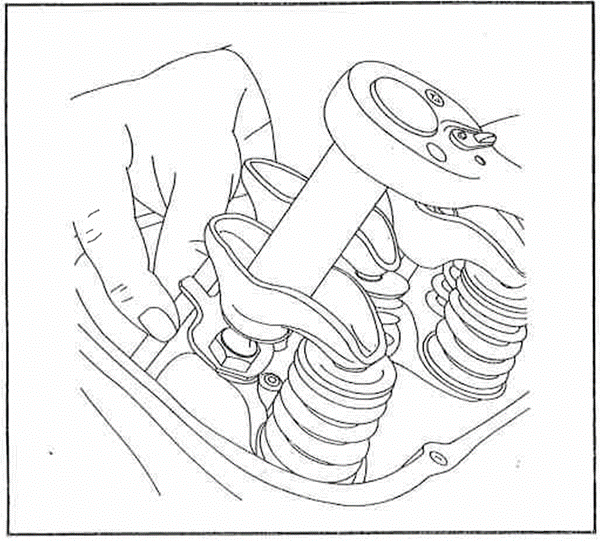
Fig. 8-120 Rocker arm adjustment with engine stopped
3. Back off the adjusting nut until lash is felt at the pushrod, then turn the adjusting nut until the lash is removed. This can be checked by moving the pushrod up and down while turning the nut until all free play is eliminated.
4. Hydraulic lifters can now be set by tightening the adjusting nut an additional 3/4 turn. No further adjustment is necessary.
5. Turn the engine one full revolution until the “TDC” mark and the mark on the harmonic balancer are again aligned. This is not a firing position. When the engine is in this position, the remaining valves can be adjusted as specified.
6. Install the rocker (valve) covers.
FAQs From Same Category
1. After the engine has reached normal operating temperature, remove the valve covers and install rocker arm stoppers to prevent oil from spraying over the engine.
2. With the engine idling, loosen the rocker arm nuts (one at a time) until the rocker arm begins to clatter.
3. Tighten the rocker arm nut until the clatter stops.
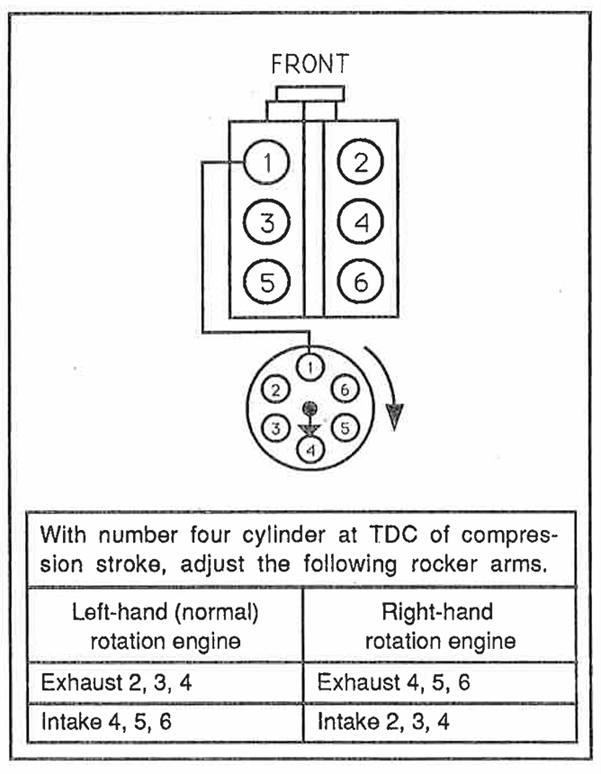
Fig. 8-32 Adjusting rocker arms with No. 4 piston at TDC (Top Dead Center) of the compression stroke
With cylinder number one at TDC (Top Dead Center) of the compression stroke, adjust the following rocker arms:
Left-hand engine rotation (standard):
Exhaust: 2, 3, 4
Intake: 4, 5, 6
Right-hand engine rotation:
Exhaust: 4, 5, 6
Intake: 2, 3, 4
4. Tighten the nut an additional one-quarter turn and pause for 10 seconds until the engine runs smoothly. Repeat until the nut has been tightened a total of three-quarters of a turn from the zero-lash position.
IMPORTANT: This three-quarter–turn preload adjustment must be performed slowly to allow the lifter to self-adjust, thereby avoiding possible interference between the valve head and the piston crown, which could cause internal damage and/or bend pushrods.
5. Rotate the engine one full turn until the “TDC” pointer mark and the vibration damper mark are aligned again. This is No. 6 firing position. With the engine in this position, see Figure 8-122 for which valves can be adjusted.
1. After the engine has reached normal operating temperature, remove the valve covers and fit the rocker arm stops to prevent oil splashing everywhere.
2. With the engine idling, loosen the rocker arm nuts (one at a time) until the rocker arm starts to rattle.
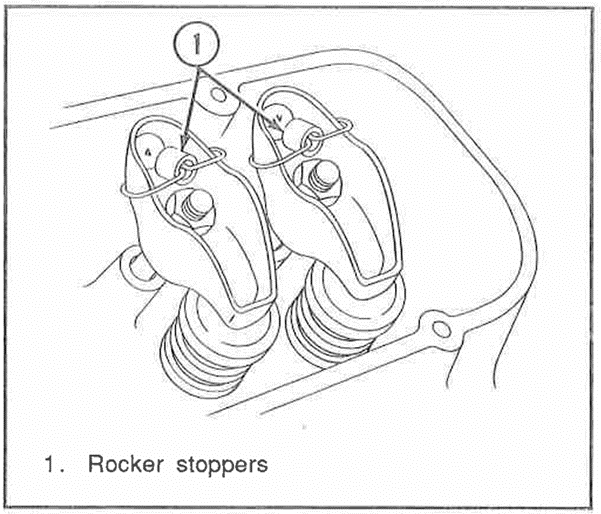
Fig. 8-123 Installed rocker arm stops
3. Turn the rocker arm nut until the clicking stops. This is the backlash-free position.
4. Turn the nut a further quarter turn and pause for 10 seconds until the engine runs smoothly. Repeat until the nut has been turned a further 3/4 turn from the backlash-free position.
5. Repeat steps 2, 3 and 4 to adjust the remaining valves.
6. Remove the rocker arm stops after all the valves have been adjusted.
7. After adjusting the valves, complete the following operations:
a. Install a new gasket and fit the covers. Tighten to the specified torque.
b. Start the engine and check for leaks.
c. Adjust the carburettor idle speed and mixture.