


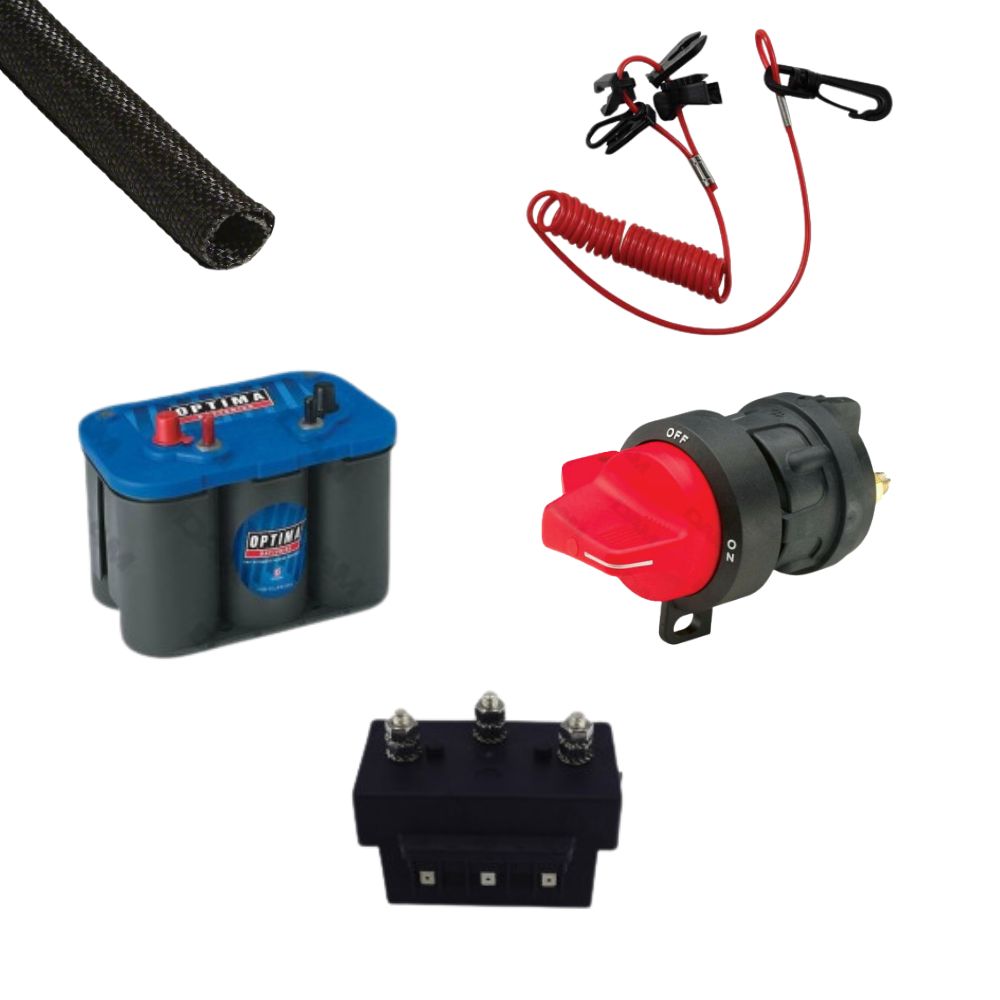


Need to make your onboard electrical system more reliable? Find batteries, accessories and connection equipment suitable for the marine environment.
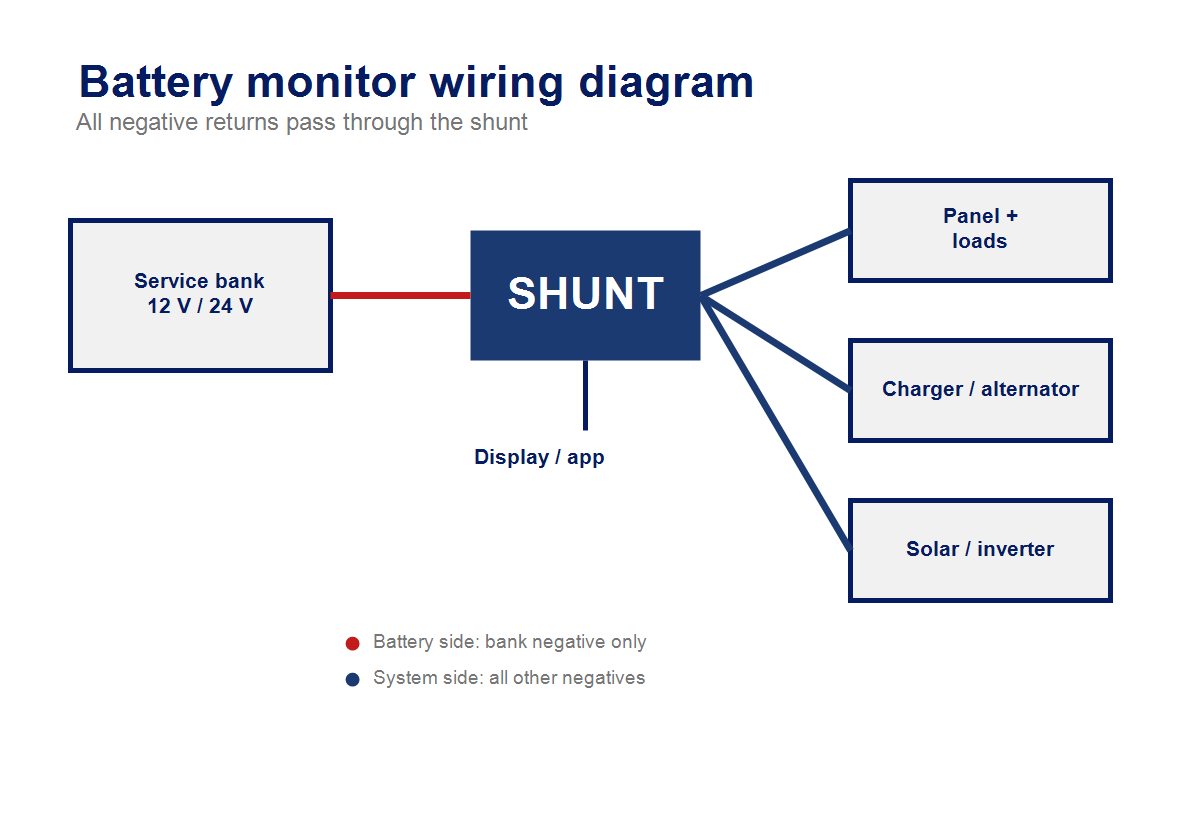
View boat electrical equipmentA battery monitor is usually connected on the negative circuit, using a shunt installed as close as possible to the bank being monitored. All charging and discharging currents must pass through this shunt for the readings to be accurate. The battery remains on one side of the shunt, while loads, chargers, alternator, solar panels and onboard returns connect to the other side. After wiring, the monitor must be configured according to the capacity, technology and voltage of the battery bank.
What is a battery monitor used for on board?
A battery monitor gives a more precise view of a battery bank’s energy status than a simple voltmeter. It measures voltage, charge or discharge current, amp-hours consumed, estimated state of charge and, depending on the model, remaining autonomy.
On a boat, this information is especially useful for the service bank. It helps track the energy used by refrigeration, lighting, electronics, the windlass or comfort equipment, then adjust charging from the alternator, shore charger, solar panel or auxiliary generator. To place this installation in the wider onboard system, you can also read our guide to how boat electricity works. This detailed monitoring also helps you manage energy on board, especially when several devices are running at anchor.
Why is voltage alone not enough?
Voltage varies with charging, discharging, temperature and battery rest time. It gives an indication, but not a full balance of the amp-hours actually entering and leaving the bank.
Why is the shunt essential?
The shunt measures the current flowing through the circuit. The monitor uses it to calculate accumulated consumption and estimated state of charge.
Which bank should be monitored first?
The service bank is the main priority, because it powers onboard equipment while cruising, anchoring and spending nights aboard. Its sizing also depends on the choice of boat battery.
What is the wiring principle for a battery monitor?
The principle is simple: the shunt must be placed on the negative side of the battery bank being monitored, between the battery negative terminal and the rest of the installation. The battery side of the shunt receives only the negative of the monitored bank. The installation or load side receives all other negatives: switch panel, charger, alternator, solar charge controller, inverter, returns and loads.
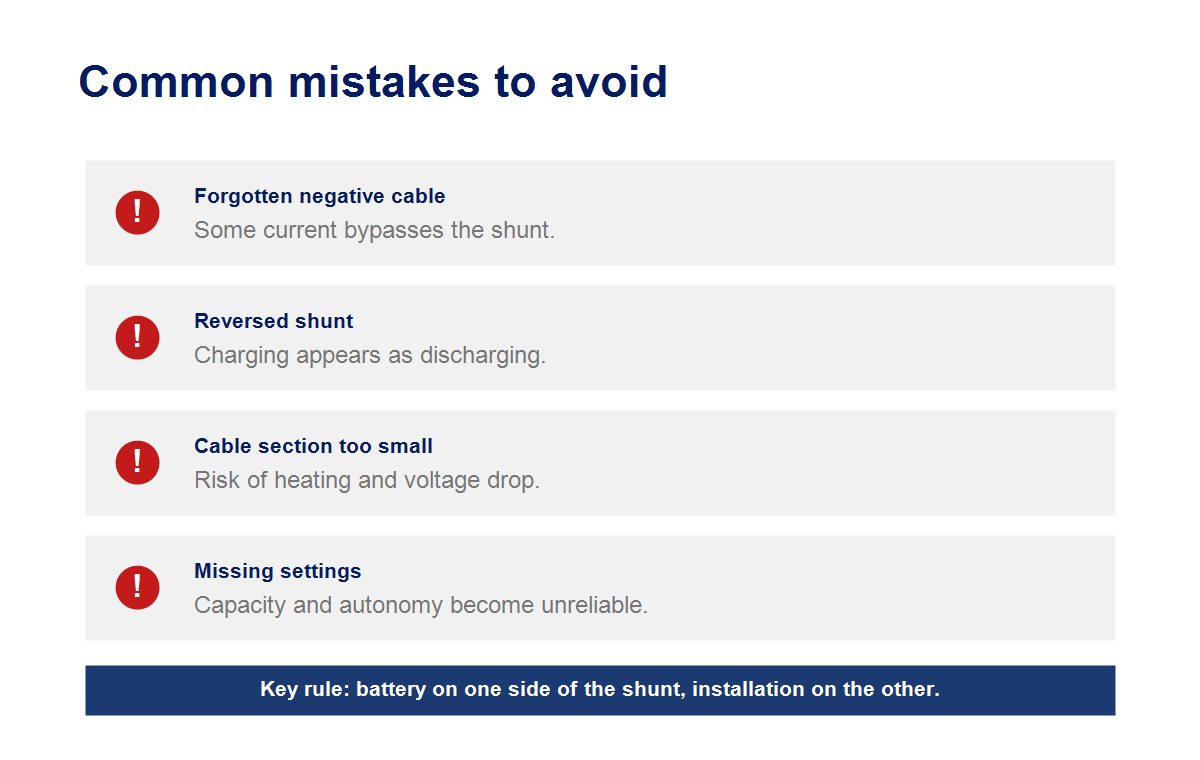
This wiring forces all current entering or leaving the bank to pass through the shunt. If a negative cable remains directly connected to the battery terminal and bypasses the shunt, the monitor will not see it and the state of charge will become inaccurate.
For reliable data, the monitor must also count every source used to recharge boat batteries.
For a clean installation, also check terminals, protection, battery switches and battery accessories suitable for marine use.
View accessoriesWhat equipment should you prepare before connecting a battery monitor?
Before starting, identify the monitor type, the shunt’s maximum current, the bank capacity and the cable route. An undersized monitor or cable can cause voltage drop, heating or unstable readings. Depending on the installation, a boat charge indicator or voltmeter can complement the battery bank reading.
- A battery monitor compatible with the onboard voltage: 12 V, 24 V or another voltage depending on the installation.
- A shunt rated for the maximum current of the bank and connected equipment.
- Cables sized consistently with charge and discharge current.
- Properly crimped terminals, protected against oxidation and vibration, with the right boat battery accessories.
- Suitable protection on small supply and measurement wires, according to the manufacturer’s manual.
- A ventilated, accessible location protected from water spray.
If you are working on an existing installation, take a photo or draw a diagram before dismantling. This helps avoid mixing up the engine negative, service negative and charging returns.
How do you connect a battery monitor step by step?
Connection must be methodical, with the installation powered down and the chosen model’s manual followed. The steps below describe the common case of a monitor with an external or integrated shunt used to monitor a service bank.
1. Isolate energy sources
Switch off the battery isolator, disconnect the shore charger, disable solar if possible and make sure no large load is operating. The aim is to work without charge or discharge current. A boat battery switch in good condition remains essential for cleanly isolating the installation.
2. Place the shunt near the battery bank
Install the shunt as close as possible to the monitored bank, in a dry, ventilated and accessible location. The cable between the battery negative terminal and the shunt must remain short, correctly sized and properly crimped.
3. Connect the battery side of the shunt
Connect the service bank negative terminal to the battery side of the shunt. This side must receive only the negative of the monitored bank so that measurements remain coherent.
4. Connect the installation side of the shunt
Move all other negative cables to the load or system side of the shunt: loads, panel, charger, alternator via the engine negative if required, charge controller, inverter and onboard returns. This is the most important part of the installation.
5. Connect the measurement wires and display
Connect the measurement wires, power supply and any display according to the manual. Some models use a communication cable between the shunt and the display, while others work with a mobile app or network interface.
6. Power back on and check current direction
Once the installation has been checked, power it back on. During discharge, current should generally appear as negative. During charging, it should appear as positive. If the sign is reversed, the shunt or its measurement wires are probably connected the wrong way round.
How do you connect a monitor with an engine battery and a service bank?
On many boats, the monitor tracks the service bank and may simply read engine battery voltage through an auxiliary input. Do not confuse this voltage reading with full capacity monitoring: the shunt only calculates correctly for the bank whose currents all pass through it.
If the engine battery shows signs of weakness, the diagnosis often overlaps with a boat engine that will not start.
If your monitor has an auxiliary input, it can be configured depending on the model to monitor a second battery, temperature or bank midpoint. The settings therefore depend on the manual and the battery chemistry used.
For a boat with an alternator, shore charger and solar charging, make sure each charging source for the service bank returns to the installation side of the shunt. This allows the monitor to count charging as well as consumption. If several batteries need charging from the same source, also check the role of the charge splitter in the installation.
Which settings are required after connecting the battery monitor?
Wiring is not enough: the monitor must be configured to match the installed bank. Without these settings, the display may be powered and readable, but state of charge or remaining autonomy will be unreliable.
- Enter the total capacity of the monitored bank, in Ah.
- Check nominal voltage and full-charge voltage.
- Adapt settings to the battery technology: flooded lead-acid, AGM, gel or LiFePO4 lithium.
- Configure the auxiliary input if it reads engine battery voltage, temperature or a midpoint.
- Synchronise state of charge after a genuine full charge.
- Set useful alarms: low voltage, state-of-charge threshold, temperature or relay depending on equipment.
For lithium batteries, do not automatically reuse lead-acid settings. Charge thresholds, depth of discharge and calculation settings may differ. To extend bank life, goodboat battery maintenance practices remain complementary to electronic monitoring.
This monitoring is especially useful during boat winterization, then when you dewinterize a boat and check voltage, charge and connection condition.
Which mistakes should you avoid when wiring a battery monitor?
The most common mistakes rarely come from the display. They usually come from a forgotten negative cable, a bypassed shunt or reversed measurement direction. On a boat, these errors are even more likely because several charging sources coexist.
Is a negative cable still on the battery?
Current passing through that cable will not be measured. All non-battery negatives must be moved to the installation side of the shunt.
Is current direction reversed?
If charging appears as discharging, check the shunt or measurement wire direction.
Is displayed capacity inconsistent?
Ah capacity, battery technology or initial synchronisation may be incorrectly configured.
How do you check that the monitor works after installation?
After installation, run a simple test: switch on a known load, then check that the displayed current flows in the expected direction. Then start a charging source and check that current becomes positive or that the energy balance rises, depending on the model.
Also check that state of charge changes gradually, that displayed voltage remains consistent with a multimeter and that no abnormal alarm appears. After a full charge, synchronise the monitor if required by the manual.
If low voltage triggers an alert or a doubt at the helm, our guide to understanding your boat warning lights can help interpret the signal. As an occasional backup, a boat battery booster is also worth knowing about before a difficult start.
| Check point | What to check | Risk if missed |
|---|---|---|
| Shunt position | On the negative side, as close as possible to the monitored bank. | Incomplete or unstable readings. |
| Battery side | Only the negative of the monitored battery bank. | Uncounted currents. |
| Installation side | All loads and charging sources. | False state of charge. |
| Cable section | Suitable for the maximum current of the installation. | Heating, voltage drop and electrical risk. |
| Settings | Capacity, voltage, technology and synchronisation. | Unreliable remaining autonomy. |
Which DAM Marine equipment should you check for this installation?
A battery monitor gives reliable information only if the rest of the installation is coherent. Before closing the battery locker or panel, check the components involved in safety, measurement and bank charging.
Is the battery bank suitable?
Check capacity, technology and the general condition of the bank in the boat batteries.
Are the connections protected?
Terminals, connectors, protection and accessories must resist vibration and oxidation: see battery accessories.
Is the isolation switch accessible?
A battery switch makes servicing easier and keeps the boat safer in case of an electrical fault.
FAQ about connecting a battery monitor
Can a battery monitor be connected on the positive side?
Most shunt-based battery monitors are connected on the negative side, according to their manual. Some specific systems may have a different architecture, but the wiring principle must never be changed without following the manufacturer’s instructions.
Does a battery monitor replace a battery switch?
No. The monitor measures and displays information, while the battery switch electrically isolates part of the installation. The two devices have complementary roles.
Should the engine battery be monitored with the same shunt?
In general, the shunt mainly monitors the service bank. The engine battery can sometimes be monitored in voltage through an auxiliary input, but this does not always provide a full remaining-capacity calculation.
Why does state of charge remain wrong after installation?
The monitor may be poorly synchronised, incorrectly configured or bypassed by a negative cable that does not pass through the shunt. A full charge followed by synchronisation and a wiring check often fixes the problem.
What is the difference between a monitor, voltmeter and charge controller?
The voltmeter reads voltage, the monitor estimates consumed and remaining energy, and the charge controller manages charging, for example from a solar panel. These devices do not perform the same function.
To complete your installation, see the marine batteries, charge indicators, battery switches and electrical management equipment available from DAM Marine.
View batteries